our weather has been sooo crazy this year--way too cold to swim--unlike last summer when we were swimming at the end of may. anyway, until today, our pool has only been used by the ducks! Ü
Pin It
Sunday, June 27, 2010
Wednesday, June 23, 2010
garage sale + make-n-take sneak peek.
my annual stampin' up!® garage sale/open house is coming up next thursday, july 1st. feel free to drop by any time between 6 & 9 pm. i will have a free make-n-take for you, too! below are some "sneak peeks" of it. hope to see you there! Ü
(sorry, this picture is a bit blurry...)
ok--so, come to the garage sale! please. Ü
(i'll post the full picture of the make-n-take after the sale)
Pin It
Labels:
for sale
Wednesday, June 16, 2010
garage sale sneak peek.
look at all this stuff! a basket full of stamps, a basket full of accessories, a basket full of ribbon, a basket full of pastels & watercolor wonder crayons, a box full of ink pads, refills, & markers, and a box full of cardstock. whew!
Pin It
Tuesday, June 15, 2010
simple card holders.
my friend lori showed me her version of these adorable card holders and i knew that i needed to make some. i'm giving these as gifts to my stampers club members--i appreciate them all so much! Ü
to make these, first score your 8 1/2" x 11" piece of cardstock at 2 1/2"
turn it the other way and score at 5 1/2"
now, fold up the bottom...
then fold in half.
i punched holes through the layers, added two pieces of ribbon and tied them in a bow to close the holder.
here is the inside with some cards & envelopes in the pockets.
and here is the card that i put inside. Ü
Pin It
Labels:
cards,
club projects,
projects
Sunday, June 13, 2010
studio.
welcome to my studio! i finally cleaned it up & decided i'd better take pictures real quick before it is not so clean anymore. Ü anyway, this picture is taken from the doorway into the room.
here is my desk which has plenty of room to spread out. the two bottom drawers hold all my card stock--even the 12" x 12"! the two top drawers hold adhesive, markers, all the extra "stuff."
here is the other side of the room. the blue baskets hold ideas i'm working on and dies and stuff for the big shot. above is my sons' artwork. it seems that the artwork is becoming more & more scarce as they get older so i'll probably start displaying cards & scrapbook pages up there.
here is another view. some of the vinyl lettering was done before stampin' up! came out with their line.
this is the other side of the window. those are 4 magnetic sheets hooked to the wall. i covered them with (retired) designer series paper.
this room has two closets to the back. one holds all this stuff...stamps, scrapbooks, ideas, etc. it kinda looks like a mess in this picture but it really is organized. Ü
here is the other closet. it just holds misc. stuff and my punches.
this is my ribbon/accessories holder that my neighbor made. you can find his site here.
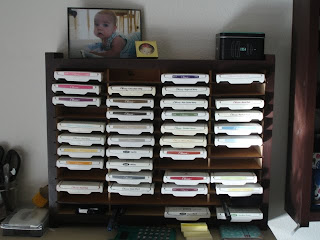
and this is the ink pad holder he made for me. as you can see it is missing some ink pads...waiting to order the retired in colors that decided to come back and join the party because of course i got rid of them when they retired. Ü
finally, here is the shelf above my desk that houses the ink pad holder and my jars of misc. ribbons, scissors, and things. hope you enjoyed the tour of my studio!
Pin It
Thursday, June 10, 2010
june club project.
this is called a tri-shutter card. it looks hard to make, but trust me, it was super easy!
you will need:
* 1- 5 1/2"x 12" piece of card stock
* 2- 1 7/8"x 5 3/8" pieces of designer paper (the flowers & birds pieces on this card)
*4- 1 7/8" x 1 3/8" pieces of designer paper (the saffron & pink pieces)
*2- 1 3/8" x 3 7/8" pieces of designer paper (the trees pieces)
*1- 2 3/8" x 3 7/8" pieces of card stock (olive piece)
*1- 3 5/8" x 2 1/8" piece of card stock (white piece)
here is another view...
1. Score your large piece of card stock at 2", 4", 8", & 10"
2. turn card stock and place in your cutter at the 1 1/2" mark. starting at the 2" score, cut a slit to the 10" score line. repeat on the other side.
3. this is what your piece of card stock will look like. score lines, and 2 cuts.
4. fold like this. the top & bottom panels are folded the same. the middle panel is opposite.
5. adhere your designer paper to your card as well as embellishments and a greeting.
this card will fit into a card-sized envelope.
& here is the card folded together. Ü
Pin It
Labels:
cards,
club projects
Wednesday, June 9, 2010
uh oh...
i just received my brand new stampin' up!® idea book & catalog and i LOVE it! to be honest, i was a little apprehensive because i really didn't like the last catalog...but this one...this one is a different story! here are all the page markers on the top of the book (& each page marker doesn't represent just 1 thing on the page i want/NEED, they represent several)!
& here are the page markers on the side...i'm dead...well, actually soon-to-be-broke. Ü
Pin It
Labels:
misc.,
stampin' up biz
Subscribe to:
Comments (Atom)


